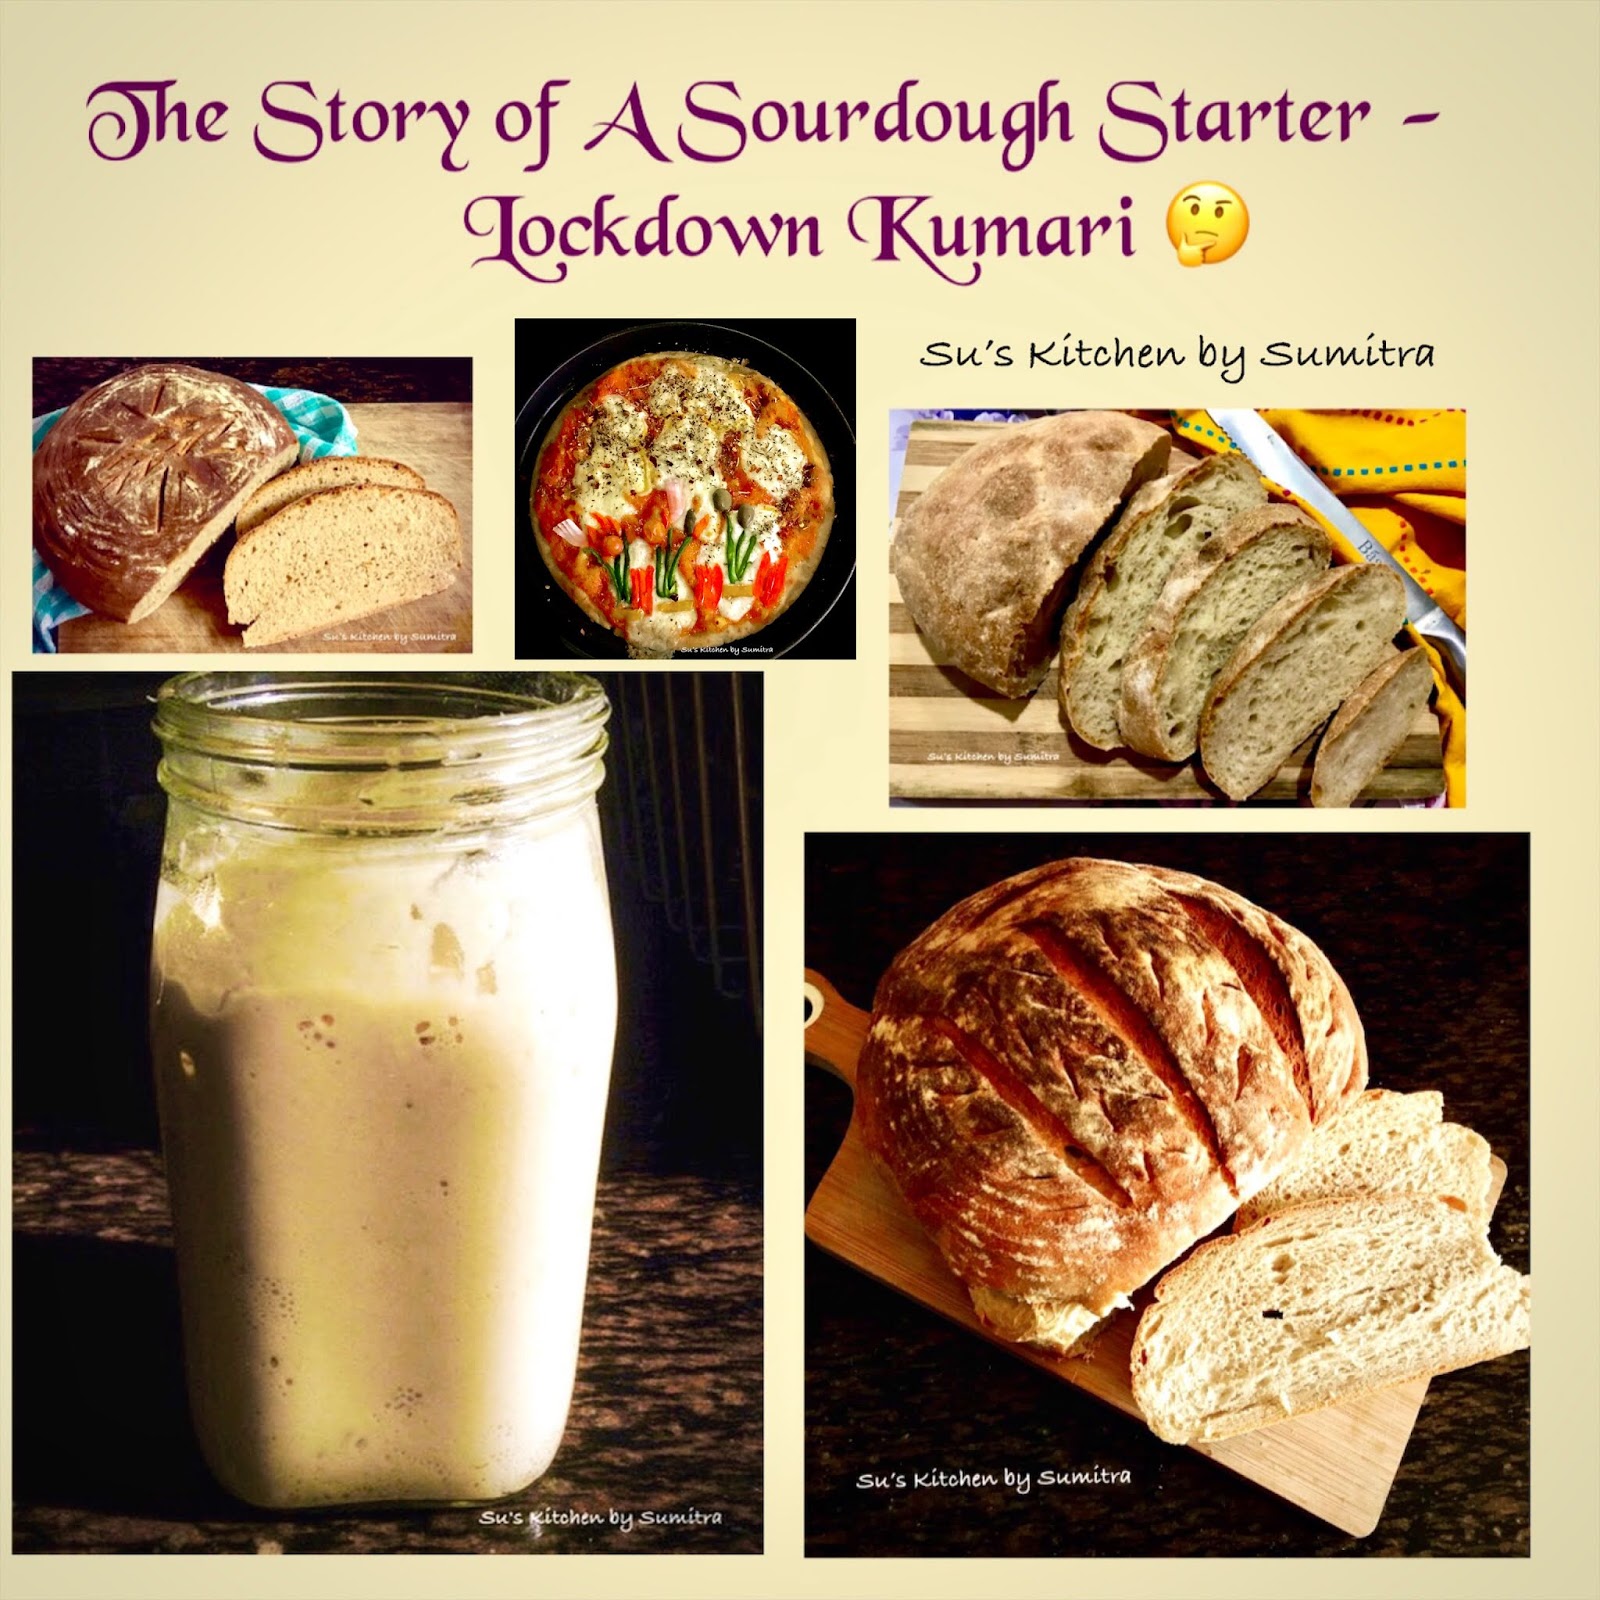
Sourdough Starter - Lockdown Kumari
It’s truly phenomenal... from 2 simple ingredients, how a wild or natural yeast can be cultivated. It can be easily made at home... patience and time are the 2 key factors.
It’s the best thing to engage your kids too. Do experiment... It’s an amazing experience to take care of the starter like your baby... Do name your sourdough starter baby...
What should I name? 🤔 Lockdown Kumari....
I had taken a class on how to make sourdough bread in Singapore, I had got the starter from the sourdough bread class, when I travelled backed to India, I had the starter, but due to some problems I was not able to feed the starter and it eventually died.. it’s been 2 years .. Since I didn’t have the starter, I was unable to make the sourdough bread.. but now thanks to the lockdown, I thought of making my own starter.
Any flour can be used whole wheat or all purpose flour or rye flour or bread flour etc... and liquid like water or fruit juice like pineapple juice or apple juice etc.
Here we will use All Purpose Flour and Water. One of the feed I used Whole Wheat flour.
Here I will share my journey of making the sourdough starter from the first day to the last day.. It’s all about my experience.. that I am going to share with we you.
There are many way the starter can be prepared. All starter will differ from one another and the time that it has taken for the starter to mature.. there can be various reasons like the texture of the flour, the water, the temperature of the place and off course the care that you are taking.. it’s like a baby.... it will take 7 to 10 days.. so don’t give up... feeding the starter is very important...
We need a clean glass jar like a jam or honey bottle... and the 2 ingredients flour and water.
Thus the simple way..as we being we will see the changes in the starter... a good starter at the end should float in a glass of water and you will feel the lightness in the starter.
The Start -
Time - 11.30 pm - Started to cultivate the yeast.
Preferably start it in the morning or night.. so it’s easy to maintain. Note down the time. Even though I began with 1/4 cup of All Purpose Flour and 1/4 cup of water and a tsp of sugar... we need 1/2 cup of water and 1/4 water.. that’s it.. so the proportion is 2:1.. no need of the sugar..
Add the flour and water in the glass jar, stir the ingredients. Incase if whole wheat flour is used, than a little more water might be required as whole flour absorbs more water. The batter should be like a thick cake batter. Place the lid on the glass jar, but don’t lock it. Keep it aside.
Day 1 -
Time - 11.30 am - Bubbles started to form
11.30 pm - Fed the starter
It many take 12 to 24 hours for the bubbles to show up. I fed the start in the night after 24 hours of the start. First whisk or stir the starter, then we need to discard 50 percent of the starter and then add 1/2 cup flour and 1/4 cup water, stir, put the lid and then keep it until the next feed...
Day 2 -
Time - 11.30 am - Fed the starter
11.30 pm - Fed the starter
The starter may need food after 8 hours... I missed the feed, so there was this dark liquid natural alcohol formed called Hooch.. Don’t worry... this indicates that my baby was hungry or incase if the water contained was more in the yeast or if the temperature has increased then there can be a hooch formation. This doesn’t harm, but discard the Hooch before whisking and feeding the yeast baby. Incase the hooch formation is more, then increase the feeding frequency or move the starter to a cooler place.
So the same process of feeding twice a day was followed. Whisked / Stirred the yeast. Discarded 50 percent of the yeast, and added 1/2 cup All purpose flour and 1/4 cup water, stir again. Close the lid and keep it aside .
Day 3 -
Time - 11.30 am - Fed the starter
12.30 am - Fed the starter
Morning After whisking / Stirring and discarding 50 percent of the starter, I had added 1/2 Whole wheat flour and 1/4 cup + 3 tbsp Water and had stirred the ingredients together. Closed the lid and keep it aside.
It’s ok to change flour.
Night the same process repeated.. After stirring and discarding the starter, added 1/2 cup All purpose flour able 1/4 cup water. Stirred and closed the lid and kept it the jar aside.
Day 4 -
Time - 12.30 pm - Fed the starter
Night - Didn’t Feed the starter
Ideally we should be feeding every time the yeast feels hungry, may be in between 12 hours or just in time... but this time I missed the feed in the night. As you observe the starter... in between the feeds, a good well fed starter will have bubbles and it’s active, when hungry the process of the activity will slow down and look dull. Sometimes the starter is still active and bubbly, then a feed can be skipped.. as over feeding can make the starter sluggish.
Day 5 -
Time - 9.30 am - Fed the starter
10.30 pm - Fed the starter
In the morning I whisked and discarded 50 percent of the yeast. Added 1/2 cup of All Purpose Flour and 1/4 cup water into the glass jar. Whisked well, close the lid and keep it aside until next feed.
In the night I whisked the starter. Took 3/4 cup of yeast starter and added in a clear fresh jar. Rest of the yeast I discarded it. Added 1/2 cup of All Purpose Flour and 1/4 cup Lukewarm water into the glass jar. Whisked well, close the lid. mark the yeast level with a marker, so that when the yeast rises you will see that it’s crossed the mark. Keep it aside until next feed.
Day 6
Time - 10.30 am - Fed the starter
10.30 pm - Fed the starter
As the yeast begins to ripen we will observe the rise and fall of the yeast as we had marked the level of the yeast. It’s still not matured completely and when hungry the level will fall.
Whisk and discarded 50 percent of the yeast. Added 1/2 cup of All Purpose Flour and 1/4 cup lukewarm water into the glass jar. Whisked well, clean the jar with moist paper towel, close the lid and keep it aside until next feed.
Day 7
Time - 10.30 am - Fed the starter
10.30 pm - Fed the starter
Now the yeast which has risen is able to hold as it’s a almost a mature yeast. You will see that it’s doubling in size too.
Evening we did performed a test to check whether the starter is ready to make a bread. If the starter floating in water, it’s time, the yeast has matured.
In the morning I whisked and discarded 50 percent of the yeast. Added 1/2 cup of All Purpose Flour and 1/4 cup lukewarm water into the glass jar. Whisked well, clean the jar with moist paper towel, close the lid and keep it aside.
Evening we did a float test and it was successful. Take a glass full of water, take a spoon of the starter and drop the starter in the water... it should float and able to hold itself in the water. It’s ready to be used for making a bread. Incase the starter is not ready, we have to continue the process until the starter floats... sometime the starter takes time to mature.
To store the starter in a refrigerator - Whisk and take 1/3 cup of yeast, add the yeast into a fresh jar and discard the rest of the yeast. Added 1 cup of All Purpose Flour and 1/2cup lukewarm water into the glass jar. Whisk well, clean the jar with moist paper towel, close the lid, and keep it in the fridge, feed the starter twice a week.. in the same manner. Incase there is any hooch or water forming, discard the water. When we take a starter to make a bread, take the required quantity mentioned in the sourdough bread recipe and rest at least reserve 1/2 cup starter, feed and store it in the fridge.
Points to take care -
Check on the smell... it should give out a tangy smell and not a bad smell, otherwise we will have to start over again.
Starter is not active - Take a bit extra care, feed well, may be needs extra feeds in between.
Over feeding - Many a times a feed can be skipped as the starter is very active, over feeding can make the starter sluggish and make the process slow.
Time - Some time due to the temperature changes, the process of the starter slows down and it takes time to mature. It may take a or 2 extra.
Liquid on the starter - Due to various reasons, there are liquids called hooch formed on the starter. Just discard it and then feed the starter. Incase you see a frequent hooch formation than probably change the temperature, place the jar into a cooler environment and increase the feed.
Discoloured starter - Incase you see any growth or colour change, immediately move out the top part and take the lower part of the starter, transfer it into a different glass jar and continue the process... maybe the starter can be saved.
You are the best judge of your starter...
Discarded Starter
It’s indeed such a waste, throwing out the discarded starter.m, but we need to do so, otherwise if we don’t discard the starter, the feeding quantity of the starter will increase, the process will slow down and the starter will weaken. As we keep feeding the quantity will keep increasing and so will the quantity of the ingredients.. so it’s best to discard some before adding. But I don’t really throw the discard starter out. Except for the first 2 days, I use the discard starter to make pizza, pancakes, breads etc.
Pizza -
Whole Wheat Bread -
Making the Bread - After keeping the starter in the fridge, the day you want to bake a bread, remove the required quantity of the starter, feed the starter and keep it out for 6 to 8 hours to get a stronger starter.
Happy Sourdough Bread Baking 🤗